Mike's Mirror Making Musings
Copyright Michael
E. Lockwood, 2005-2007.
0.0 - Introduction, disclaimer, random info
This document is intended to help mirror makers take some of the
mystery out of figuring, and to make the process more tolerable.
After making
a good number of mirrors, some techniques float to the surface and
just
seem to work better. It is my goal to mention these here.
Some things just don't seem to work well. I'll try to
mention
those too.
The advice given is intended to help those working on mirrors
from 4" to 12" in diameter, with focal ratios between F/5 and F/8.
Faster or larger mirrors may require different techniques and
often
subdiameter
laps. Slower mirrors are ideally figured with very gentle
techniques
that remove glass very slowly, or they can be left spherical if that is
desired. Advice on topics other than figuring may be applicable
to mirrors that don't fall in the range given above.
DISCLAIMER:
There are many, many ways to make a mirror.
What I'm describing here is my particular flavor. There are
no absolutes in such a bizarre undertaking that involves making one of
the most precise surfaces ever crafted by a being on planet Earth.
I've taught mirror making classes, and these techniques worked
well there. The problem is there are so many variables involved
that each person will have to control a slightly different set,
depending on their work habits, environment, choice of materials and
how they work their hands and arms. So, to reduce the chances of
missing some critical bit of information, I
also expect that you've read at least two other pieces of literature on
mirror
making before you start relying on my instruction for making critical
figuring
decisions.
If you have any doubts about whether I'm right or not, remember one
thing - it's MY web page and I'm always right here! All
temperatures are
in degrees Fahrenheit, and all dimensions are in inches.
Edit 2019:
I commonly see people on online forums asking for advice.
They then receive advice from several (or more) people, and that
advice often conflicts with other advice, and the potential mirror
maker becomes confused. They are probably already confused
enough, and they don't need more confusion and indecision about how to
proceed.
So, my advice is as follows: Pick one mentor
and one method and learn all of its little tricks and finish your
project. If you want to learn another technique, do it on a
different mirror, or do it only after you and your mentor agree that
the original approach will not work for your project. Learning to
make a difficult mirror on an online forum is like trying to herd cats
remotely with a radio-controlled toy. (End Edit 2019)
Now for some instruction to make the art of figuring a bit easier and
hopefully faster, too. First I'll lay a bit of ground work on
fine
grinding, polishing, and lap pressing. Hopefully this will help
the reader get successfully
through polishing with a mirror that's more likely to be in a state
that's
ready for figuring.
0.1 - Fine Grinding
I recommend taking the time to fine-grind the backs of the mirror and
tool.
It will make polishing easier later on. What, you're
ignoring that previous statement?! DON'T!
If your mirror is at all thin for its size, grinding the back of the
mirror is just as important as grinding the front! If the back is
not flat, the mirror will warp during grinding and polishing, and you
will probably end up with ASTIGMATISM, and there is no reason for this,
other than carelessness. No matter how well you figure the
mirror, if it has significant astigmatism you will never be happy with
it, and it will not perform. Also, a smooth mirror back will
allow the mirror to slide around in the mirror cell more easily, which
makes it less likely to "hang up" and get stuck in certain
positions. This can affect performance by pinching the mirror,
and it can cause collimation to intermittently shift. A smooth
mirror back helps avoid these problems. It also looks better!
Grind the back of the mirror agains the back of the tool or against
something else (a piece of glass, or flat piece of metal) until you
don't see much difference from GOOD straight edge. Better yet,
use a good spherometer to check the curvature. Keep grinding the
back up through at least 12 micron, making sure it stays flat.
You don't have to grind as long as the optical surface, but try to
remove most of the pits of the previous grits.
Fine grinding is your last chance to get rid of pits from 220 grit (or
worse), which will NOT polish out before your run out of time,
patience,
and cerium oxide. My grinding sequence is typically 80, 120, 220,
320, and then I begin fine grinding with 25 micron. I HIGHLY
recommend
MicroGrit aluminum oxide - it's really good stuff. When you make
the transition from 220 or 320 carbo to 25 micron aluminum oxide, spend extra time at 25 micron and
make DAMN SURE that
no 220 or 320 pits remain. (You can use 40 micron instead of 25
micron,
or use 40 micron and then 25 micron.) There will always be some
larger pits, but
should
change locations after each wet or two. These come from the
subsurface cracks produced by grinding with carbo, and must be removed
with the aluminum oxide. Spend at least an hour
here
if this is your first mirror, preferably more. Use the time to
tweak
the sagitta and get the focal length closer to what you want.
I've
spent several hours on 25 micron, because sometimes 220 pits can take a
while
to remove.
Carbo and aluminum oxide are different materials with different
characteristics, after all. So, I check carefully for pits after
320 grit (looking for generation marks or 220 pits) and then do a
serious cleanup and grind with 25u for an extended period to remove
subsurface fractures until the grind looks excellent.
Alternatively one could use 500 grit, but I prefer to save a carbo
cleanup step and just run with 25u longer. This also gives time
to tweak the focal length a bit if necessary, and to get the blank nice
and spherical before moving on..
When using fine abrasives, take several teaspoons and put
it in a
squirt
bottle. Add about 8 ounces of water. The mixture should be
like
milk when shaken, containing a good amount of abrasive. Shake up
the
mixture, and squirt on a small puddle about the size of a quarter, and
gently
set the mirror on the tool. Watch the layer spread out between
the
two disks. Take a few gentle strokes. A little
water/abrasive
should ooze out the edges, but most should stay between the disks if
you've
used the right amount. Start working, but with fingertip pressure. In other words,
don't push down on the
top
disk - merely let the weight of the mirror or tool do the work.
(This
is your time to relax and rest your hands and arms before the labor of
polishing.) You'll start to hear
the
abrasive biting in after a minute or two - that's when the grinding
begins. Friction will be quite low. At this point, note if
there is any slip/grab tendency -
if there is, there is more asphericity than there should be or a
mismatch between the shape of the tool and mirror. Keep going,
but be gentle.
After 10-15 minutes of grinding
there
should be no bubble in the center (a sign that the tool and mirror do
not
mate
yet), and the surfaces should thus be in full contact. (If not,
go back to the previous abrasive and get it spherical.) Clean off
the
glass
"sludge" every 15 minutes or so. Add a little water if the
mixture gets too dry. You don't
need
too much abrasive - it doesn't wear out that quickly. You
will
need
less abrasive as you continue grinding, as the surfaces will mate
closer
and closer and you won't need as much to fill the gap.
The way I do it, fine grinding is a
much wetter process than coarse (carbo) grinding. With
MicroGrit, this method works very well, and the grind is quite
efficient. Drying out the grind is asking for nonsphericity, in
my experience. (If you have your own techniques that involve very
dry wets during fine grinding, that's fine, but I never do it that way.)
When there are no bubbles of
air trapped between the blanks, you're probably removing pits on all of
both
surfaces. You can verify this with the sharpie test - draw a grid
of lines such that they create approximately 1" squares on
the surface of the mirror. Then grind for a bit - ideally the
lines
will go away uniformly if you do a few minutes of MOT and then a few
minutes of TOT work (or TOT then MOT, it shouldn't matter). You
can usually go on to the next abrasive if the lines
have been worn away a couple of times, provided you don't find
abnormally large pits. Looks very carefully at the edge and
center of the blank with a loupe. Try to find pits that are
several times larger than the background small pits. If you find
these, chances a previous grit's grind wasn't quite complete. If
you find them only at the center or edge, then the radius of curvature
of the mirror has changed a bit since that larger grit was used, and
you should not start polishing until you're sure it is spherical.
After all big the pits from carbo are gone (and you've looked very hard
for
them!) due to 25u grinding,
I usually go to 12 micron, and then 5 micron. Each should take
1/2 to 1 hour if 25 micron was done correctly. Do more if
you
have any question in your mind about remaining pits. Use a 10X
power
eye loupe or magnifier to inspect the surface - it should be VERY
uniform in pit size over the entire surface of both disks, and free of
scratches. If you
finish 5 micron
MicroGrit with an excellent uniform grind and no scratches, polishing
will go much faster. Be gentle in all fine grinding, but be
very
gentle at the end of 5 micron. Add water only if you can get away
with
it during the last 15 minutes of 5 micron work. Keep the work
from
drying out or there may be contact problems. Use fingertip
pressure
to move the tool/mirror. A good 5 micron grind will ensure fast
polishing. If you know what you're doing, you can use 3
micron. I find that finishing with 3 micron abrasive speeds up
polishing over 5 micron. Just be careful and gentle with the
grinding.
A few last tips about fine grinding:
1) Near
the end of fine grinding, when using 9u or 5u, don't use too much ink
for the sharpie test. Opt for a thin line rather than a
wide line produced by some permanent markers. The ink itself can
affect the contact between the tool and mirror, so keep it to a
minimum. The lines should grind away quickly and uniformly.
Be especially concerned if the lines near the edge of the mirror have a
tendency to not go away as quickly as other areas of the mirror.
If you work both TOT and MOT and this happens, you need to looks for
pits, grind longer, and check your grinding stroke for the proper
length/technique. Redraw the sharpie lines and grind gently until
the lines near the edge of the mirorr disappear just as quickly as in
other areas. Then be grateful - you have just saved yourself many
hours of polishing!
2) Clean off the sludge for the last
5-10
minutes
of grinding with each fine grinding abrasive and randomize your
stoke a bit to help get as spherical as
possible before switching grits. This will help avoid grinding in
a low outer zone, which takes a LONG time to polish out (as mentioned
in hint 1). This is especially important for the last grit - you
want a sphere accurate to 1u at the end of 5u grinding, which you will
obtain automatically with proper technique.
0.11 Glass- and tool-specific
advice
- For grinding glass on glass (usually by hand), I often finish
with 3u and 1u, which leaves an incredible surface that polishes in
much less time than a surface finished with 5u. This can save a
lot of work if you ware working by hand. A nice 1u grind is a
beautiful thing to behold. This is not recommended for a first
mirror, as some fine grinding experience is recommended to make 3u and
1u work properly.
- For tile tools grinding pregenerated
Pyrex, I typically go with 320, 25u, 12u, 5u. I find that I often
get scratches with 3u with tile on Pyrex. If the generation is
really nicely done (typical for United Lens blanks) then I start with
320 and just grind for a bit longer to get rid of the generation
marks. For glass on pregenerated Pyrex, keep going with 3u and 1u
if you wish.
- For BVC ground with a tile tool, I stop at 9u. I find that
tile on BVC with 5u leads to scratches, even at slow grinding speeds.
- You can use finer abrasives with tile tools if you stone or bevel
the edges of the tiles to remove the sharp edge. I usually don't
bother.
0.2 - Pitch and Lap Tips
I use Cerox 1670 from Salem Distributing. It cuts fast and
leaves a fairly smooth surface. It can be used for figuring if
you use
a lot of water. However, refined Cerium products are better for
figuring -
they
leave a smoother surface, work slower (and therefore are easier to
control), but cost more. Other
ceriums
may work just as well as the one I recommended. (However, I have
heard
of several people having some scratching problems with Cerium from
Willmann-Bell, myself included.)
I recommend Gugolz 64 pitch for polishing at around 70 degrees
Fahrenheit for moderate F/ratio mirrors (F/5-F/7). For a
Texereau-style pitch hardness tester, G64 has a fall rate in the range
of 0.030" to 0.100" in five minutes (1 kg mass, point ground as
described by Texereau in an appendix).
At this hardness (for Gugolz 64), the pitch channels will close up in a
few hours of work. I have found that one of the best
indicators of the hardness of a pitch lap and how well it is working
with the operator's tecnhique is the time it takes the
channels in the lap to (nearly) close under normal hand
polishing conditions. For me, pitch that flows enough in 1
hour to nearly close the channels is quite soft (like Gugolz 55,
mentioned below), and a lap with channels that close up only after 10
or more hours is really hard. My preferred range for
work with a full-size lap is a channel closing time of 1.5 to 4 hours.
I like Gugolz 55 for subdiameter figuring laps at this temperature,
especially for use on mirrors faster
than F/5 (which I am not discussing here). G55 is also good for
polishing in the winter, when I'm cheap
and only heat the house up to 65 F. Figuring an F/4 mirror larger
than 8" with a full-sized lap requires using unconventional methods, so
I
use soft subdiameter laps for this. Subdiameter laps are a whole
other
animal, and I'm not covering their use in this document. The fall
rate for a Texereau-style tester is closer to 0.080" or 0.100"+ for
Gugolz 55.
Gugolz 73 works well for making optical flats because it's DAMN hard at
65-70 degrees. The channels close up quite slowly, in 10+ hours
of work. Sometimes they never seem to close!
Note - the hardness of pitch can vary depending on how old it is, how
it has been treated, and by who manufactured it and how well they
control the hardness in their manufacturing process. If you are
having figuring problems and suspect the pitch, I encourage you to take a few hours and build a simple pitch
tester - it will help you identify what hardness of pitch you
are working with.
0.21 - A few lap-making
thoughts:
I make my mid-size laps by cleaning the mirror and placing a layer of
tin foil over the mirror. Wrap a wall of masking tape around the
mirror, over the foil. Pour the pitch on the mirror. WARNING: if your mirror is plate glass,
this may cause the glass to crack if you haven't warmed it up gradually
to about the same temperature as the pitch!
After pouring, the
pitch should flow out to be at least 1/4" thick at the edge of the
mirror. I like a lap thickness between 1/4" and 3/8".
Thicker is fine too, but it requires more pitch. Before the
pitch cools
too much, set the tool on the pitch, making sure that one edge contacts
before the other. The tool will "float" on the pitch if it's not
too hot.
(If it is too hot, some pitch may be forced upward between the masking
tape and the tool.) Make sure the tool gets into contact with the
pitch over its entire surface - this may require you to press down the
tool into the pitch using your hands or weights. Once the tool is
in full contact with the pitch, remove any weight you have placed on
the tool. Let the pitch cool, remove the masking tape,
and slide the pitch
lap
off the mirror. (That operation may NOT be easy, but it will
eventually
slide off.)
Once the mirror and lap are separated, the foil should peel right off
the pitch. If it doesn't, run some cold water over it for a few
seconds and it will. Voila, we have a lap that will be in full
contact almost from the beginning, as long as there weren't too many
wrinkles in it. Channel it by your choice of methods.
0.3 - How to Press a Lap
My motto is "When it comes to pitch laps, contact is everything".
NOTHING will work as it should if you don't have contact.
Here's how I get it.
A warm press is done when a lap does not conform well to the mirror
(facets off by 1/16" or more in height), or when you are pressing a
very hard pitch lap. Warm pressing involves heating BOTH the lap
and mirror to about 90
degrees in a water bath. Do it in a clean container, not in a
dirty sink.
Use a thermometer or you can easily overheat the water. If
you're using plate glass for the mirror or tool, raise the temperature
of the water gradually or you may fracture the glass - you have now
been warned twice! From
here on,
I'm assuming everything is Pyrex. Once both pieces
are
heated,
remove
them from the water and apply polishing compound liberally to the
pitch.
Don't be afraid to wet the pitch and then sprinkle on a little
Cerium. Be wary that a little goes a long way, and don't waste
it.
Spread it out with your finger.
You want to get some Cerium
pressed into
the pitch right now. Put the lap on top of the mirror, which has
also
been wetted with some polishing solution. For an 8" lap, apply
about
15 - 20 lbs. to the back of the tool. After about 10 minutes, I
usually
remove the weight and separate the lap and mirror. Then I set the
lap back on and add the weight again. This presses even more
cerium
into the pitch. Press for a total of an hour and the lap should
be
in good contact. Have a tasty beverage and relax while the weight
does
the work. If the pitch is really soft and the channels close up a
lot, you are probably done with pressing. It should appear that
some of the polishing compound has imbedded itself in the surface of
the pitch over all of the lap. For Gugolz pitch, which is black
in color, this pitch will take on a grey, matte finish, rather than
black and shiny.
I use warm pressing when I need to "move" the pitch around a lot.
This
technique is dependable, controllable, and quite useful. Once
contact
is estabished at the beginning, you shouldn't need to warm press unless
you
don't use the lap for a while (a week or more). A lap that
requires
warm pressing every time you use it is probably TOO HARD. (Again,
that's
my opinion, and this is my web page.)
A cold press is NOT an option before ANY polishing or figuring session
-
you MUST do it. Raise your right hand and swear an oath that you
will
not start polishing without a proper cold press. Skipping the
press
is just asking for unpredictable figuring and worse.
Generally, I press with the mirror on the bottom, because the mirror
acts
like a bowl that retains liquid/moisture better. Spread some
polishing
mixture on the mirror surface. Spritz on some extra water with a
spray
bottle. Set on the lap, and add weight. You will have to
learn
to judge when the lap is in contact - for a medium softness lap 8" in
diameter,
intimate contact is obtained at the earliest after 1/2 hour. Want
a full hour if you have any question.
After time has passed, remove the weight and flip the mirror/lap over
if you are going to polish mirror-on-top (MOT). Do NOT separate
the lap and mirror. If the mirror/lap have dried out, decenter
the lap
or mirror slightly and spritz on the water or polishing mixture.
Gently rotate
the mirror or lap to distribute it, and start polishing.
Important - you should feel even, significant drag when polishing.
It should be the same in all directions and parts of the stroke.
You
should also feel drag if you spin the lap/mirror - it shoudn't spin
like
a top! If it spins easily, that's a sign that the center of the
lap
is in contact, but not the edge, or that the polishing mixture is too
thick.
If you have doubts on lap contact, stop and press, dammit!! This
is less critical during initial polishing when you're just removing
pits,
but SUPREMELY critical when your are spherizing or figuring.
NOTE:
For strongly aspheric surfaces (F/4 parabolas and faster), the
lap
drag will decrease as you decenter the lap during figuring. For
the
mirrors I'm discussing here, the drag may vary a little during
figuring,
but not too much. At any point, slipping/grabbing is a sign of
problems,
and pressing should be done immediately. Stopping to press is
encouraged
- it gives you a break from the labor of polishing, and encourages the
formation
of spherical surfaces. Press every 1/2 hour if you like,
esepecially
later in polishing. Pressing is often overlooked by those seeking
a
spherical surface. Without pressing, the lap shape can get out of
control
(especially with hard pitch) and the figure will follow!
0.4 - Polishing
For 4"-12" mirrors, I like to stick my palm to the back of the mirror,
and push the mirror forward while applying lots of downward pressure
through
the center of the lap/mirror. For larger mirrors, you can apply
both
palms. A 4" is challenging for anyone with large hands.
Just
a little moisture will allow your hands to adhere to the fine-ground
back
of the mirror (you did fine grind the back, right?). Another
option
is to use some of the rubber material that you put in the bottom of
drawers
that is intended to keep things from sliding. Try not to apply
pressure
with your finger tips or the back of the heels of your hands - make the
pressure
go through the center of the work through your palms.
I will note here that, especially later in polishing, you can often
feel when
the mirror isn't spherical if the lap is in good contact - the friction
will change slightly during the polishing stroke, indicating that the
lap and mirror don't mate perfectly for some position. My most
frequently obtained defect is high outer zones (also referred to as
TUE, but more than
the edge is turned up), and I can feel the just-pressed lap digging
into
it as the lap moves away from a centered position. After
polishing
a bit, this sensation is gone. This is because the pitch has been
pushed
up at and inside the edge of the lap, and the edge is not being worked
as much.
This
is a good time to stop and press, and then work on the TU zones some
more.
(Texereau's method of TUE removal has been very effective for me
for
high outer zones.
Vary the length of your strokes, and the side swing. The normal
polishing stroke is a stroke with a slight W to it, averaging 1/3 the
diameter of
the mirror (1/3 D) in length total. Do some longer, some shorter.
For
some reason, I get my best spheres with softer pitch, polishing MOT.
If
the edge is turned up at the end of polishing, I widen the W a bit to
make
the center deeper and head towards a sphere.
Trim the lap channels when they get narrower than 1/8" or so.
Keep the edge of the lap beveled. Try to be neat with
trimming.
After about 5-6 hours of polishing an 8" mirror, most of the pits
should be gone. Check the figure with a Foucault tester.
You should
begin practicing your testing skills now, and take enough time to learn
to take accurate readings. Others have covered Foucault testing
in
excellent articles - I assume the reader has attained a reasonable
degree
of testing ability, and can repeat readings to within a few thousandths
of
an inch for a moving source tester.
If the edge is turned down (TDE), I encourage some tool-on-top (TOT)
work. Volumes have been written on TDE, and I will let you read
them. In my experience, TDE is from imperfect contact, which is
often caused by the lap "riding" on top of a raised defect in the
mirror, such as a turned up outer zone (see my oblate sphere page), or
a layer of water and cerium oxide that is too thick. The layer of
polishing compound might be floating the mirror, causing the mirror to
tip slightly, and planing off the edge. If the polishing is done
without enough water, the lap and mirror can dry at the edge and more
wear then occurs there, causing a TDE. If you press down on the
edge of the lap without knowing it, or apply pressures that "tip" the
lap or mirror slightly as you polish, this can cause TDE. So,
keep good contact, spray on water when needed, and press down in the
center of the mirror.
TDE is different than a longer focus outer zone. Technically, the
edge of the mirror is the outer 1/8" or 1/16". That does
NOT include the outer zone!!!!! The outer zones
are the outer 1-2" of the mirror, and represent a large percentage of
the surface area of the mirror. Starting figuring with outer
zones that have a longer ROC than the central zones can actually be
beneficial, since some of the edge correction is already done. If
you don't see a diffraction ring all the way around the mirror, chances
are you have a TDE. It should be fixed before figuring. If
the outer zones have a longer ROC than the center, do a zonal Foucault
test and evaluate the figure of the mirror. You might be farther
along than you think. I have started figuring a few times with an
outer zone that's on the order 20% corrected, while the edge of the
mirror was good.
0.5 - Avoiding scratches
I have never strained pitch. I reuse it many times until it
becomes too hard and then it gets tossed. Getting pitch hot
enough to strain releases much of the volatile compounds that make it
soft and useful.
Scratches are caused by:
1) Incomplete polish - particles catch
in pits and cause scratches. The solution is to polish longer and
see further causes below.
2) Cleanliness issues - keep laps covered when not in use, and simply
wipe the mirror with the edge of your hand before polishing.
3) Poor quality cerium - decant bad cerium or buy better quality cerium. (I think this is the most common cause.)
4) Hard pitch or poor lap contact - use softer pitch and make sure laps are in full contact.
5) High polishing pressure - reduce polishing pressure. Often hard pitch and heavy pressure make for lots of sleeks.
Dust falls constantly, but I have never, ever seen a scratch from
it. Laps just absorb it, or it gets carried away by the cerium
slurry. Most sleeks during polish are from poor cerium, I believe.
This assumes a reasonably clean environment. What is clean to some
is not clean to others. If it doubt, just vacuum a lot and try to avoid
having strong breezes blowing through kicking up dust. Reasonable care must be used here.
You should worry more about the bigger particles that doesn't get
airborne. They have to get on the lap or mirror somehow.
So, just keep whatever is over the mirror clean. For me that's
the machine arm and tool, for polishing by hand that is the hands and
arms and sleeves.
1.0 - Figuring a mirror with a full-size lap
In order to start figuring, the following conditions should be met:
1) The mirror is polished out - no pits can be
detected.
2) You are comfortable with Foucault testing and can get
reasonably accurate, repeatable readings.
3) You know how to analyze data, or are comfortable using the
excellent free software available. (I use FigureXP.)
4) The lap is in good condition, of acceptable hardness, and in
good
contact. This is NOT the time to make a new lap.
5) The edge of the mirror is not turned down, and the surface of
the mirror appears smooth (not rough) under the Foucault test.
6) There are no major raised areas or depressed areas on the
mirror (zones). A TUE or raised center are okay, in moderation.
Every figuring step starts with a cold press long enough to obtain full
contact. This is not negotiable. Remember, contact is
everything.
Figuring is the process of making a fairly spherical mirror into one
that isn't a sphere. The parabolic shape that we desire is either
"deeper" than a sphere in the center, and matching at the outer edge,
or "flatter" than a sphere at the edge, and matching at the center.
A non-spherical shape in the mirror implies that the pitch must flow in
order to conform to the shape of the mirror once the mirror is
decentered
from the lap. While centered, the lap and mirror mate.
As
soon as a stroke starts, the pitch must flow to maintain contact, and
the action of the lap is
not
nearly as predictable. This is why figuring is so mysterious -
it's
tough to predict just where the contact between the pitch and mirror is
the
most intimate, and this is where the most action, or wear, is
occurring. Therein lies the art of making optics.
1.1 - Basic strokes - the normal
stroke
Let's start with the basic strokes - 1/3 D, COC. That's a stroke
that's a total of 1/3 the diameter of the mirror long, and the centers
of the mirror and lap coincide at some point during the stroke - COC =
center-over-center. Some side-to-side motion is fine, the stroke
doesn't have to go exactly
COC. There are two varieties of this stroke - MOT (mirror on top)
and
TOT (tool on top). Either stroke can be used to obtain a
reasonably
spherical mirror.
Figuring strokes are SLOW and deliberate, and gentle. Start and
stop
the strokes smoothly. Going too fast will cause the mirror/tool
to
slip and grab, indicating that you have lost contact. Slow and
smooth
strokes are a necessity, and allow the lap to stay in contact and
encourage
smooth optical surfaces to form. Smooth is important,
particularly
if you want to do demanding planetary observing.
When the pitch is reasonably soft and in good contact, and the two
surfaces are fairly close to a sphere, the area worked by the lap can
be assumed to
be most of the mirror, with more wear occurring near the edge of the
mirror
when the lap is on top, and more wear occurring near the center when
the
mirror is on top. Thus, a mirror with high outer zones (often
called
TUE) may be remedied by doing some MOT polishing to deepen the center,
thus
shortening its radius of curvature (ROC) to that of the outer zones.
This
may be quicker than wearing down the outer zones, and less likely to
turn
the edge.
However, when used on a non-spherical mirror, the results are not
as predictable. In general, the overall effect is similar,
though.
After a good cold press, MOT normal strokes (not parabolizing
strokes)
will generally help remove defects near the center of the mirror.
High
spots or low spots, such as a raised ring outside the center or even a
central
hole, can be "smoothed" using MOT normal strokes. The overall
correction
of the mirror will DECREASE, though, but this is remedied by switching
back
to the parabolizing stroke. Using the TOT normal stroke, defects
in
the outer zones can often be smoothed. In general, MOT normal
strokes
will reduce correction near the center earlier (as the central area is
more
likely to spherize) than the edge, and TOT normal strokes will reduce
correction
in the outer zones more quickly than the inner zones. This is not
a
hard and fast rule, but I have found it to be reasonably dependable.
So,
overcorrecting the outer zones can be remedied by TOT normal strokes.
A
hole in the center can be helped by MOT normal strokes.
With the purpose of normal strokes now understood a bit better, it's
time
to start figuring. If have started figuring from spheres, from a
shape
with a raised center and partially corrected outer zone, and from
variations
of these. So long as the deviations from a sphere are fairly
smooth
(no deep troughs) and are only 20% or 30% of those of the ideal
parabola,
figuring can generally begin, as long as the edge is good.
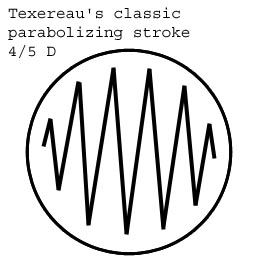
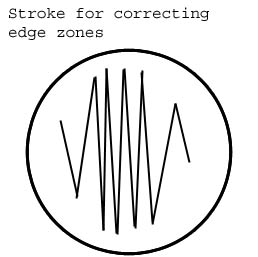
1.2 - Alternative parabolizing
strokes
Below on the left is a picture of Texereau's recommended parabolizing
stroke.
On the right is my recommend parabolizing stroke to start
with.
Both are done MOT, with slow, smooth strokes. The line
depicts
the travel of the center of the mirror over the lap.
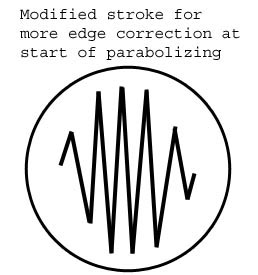
The most common error I see with parabolizing with a full-size tool is
polishing
a deep central hole into the mirror with little edge correction added.
So,
until the worker knows how the lap is going to act, start with the
stroke
on the right. This will add more correction in the outer zones of
the
mirror. Hopefully, smooth correction will be added from the edge
to
center. Center correction is EASY to add by decentering the
mirror,
and we can do that later, after the edge is in good shape. I
recommend
working with the stroke to the right for about 10 minutes. Keep
the
mirror/lap wet to slow down the polishing action, and keep the strokes
slow
and smooth. The weight of the mirror is all the pressure that is
used.
Towards the end of the 10-minute session, you may feel differring
amounts
of friction when the mirror is centered and when the mirror is offset.
This
means the lap/mirror have changed shape, and a cold press will be
useful
soon.
So what is correction? Correction is departure from a sphere.
In
our case, while all of the mirror surface is being polished, the most
glass
is being removed near the center. This means that the central
zones
will have shorter ROCs than the outer zones. Starting with the
central
zone and moving out, each zone has a longer ROC than the one before.
I
define the difference in ROC between two zones as the "difference" or
"delta".
Example 1.1:
We are figuring an 8" mirror with a full-size lap. It's of
moderate
focal ratio.
We are using a 4-zone Couder mask for the Foucault test. The
ideal readings
for the Foucault test are: 0.000", 0.020", 0.040", 0.060".
We note that the total correction is 0.060" - that is, the difference
in
ROC between the outermost and innermost zones is 0.060". The
difference
between any two adjacent zones is 0.020". (Getting the same
"correction",
"difference", or "delta" between each adjacent zone is possible by
designing
the mask openings such that each annulus (ring) has the same surface
area.
The mask opening shows a part of this annulus.)
Let's say the stroke I described above works well. We might see
the
following readings after doing the Foucault test: 0.000", 0.005",
0.015",
0.030"
Now we compare the differences between the zones (deltas) to the ideal
deltas.
The measured deltas are: 0.005", 0.010", 0.015".
Divide each measured delta by the ideal delta (0.020") and multiply by
100
to get the percentage correction. We get: 25%, 50%, 75%.
If the mirror tested perfect, we'd see 100% for all three. These
percentages
represent how much the slopes of the two adjacent zones differ.
The Foucault test measures slope, and in figuring we make the
zones have different
slopes. The slopes get shallower of "flatter" as we move out from
the
center. As it is, the corrections we measured are higher as we
move
out That means the slope differences are greater as we move out
on
the mirror, and closer to the ideal relationship. We would say
this
mirror has more "outer (edge) correction" than "inner correction".
This
would be the ideal outcome of using the stroke I described above.
The
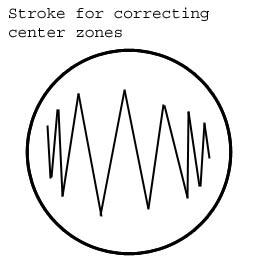
next step in figuring this particular mirror would be to adopt as
stroke
that introduced more center correction and less edge correction, and to
sneak
up on approximately 100% correction in each zone.
Example 1.2:
For the same 8" mirror mentioned above, we take the following
measurements:
0.000", 0.015", 0.025" 0.030"
Calculating the corrections (find deltas, divide by ideal delta,
multiply
by 100), we get: 75%, 50%, 25%
We have a corollary to the case above (Example 1.1). Now, the
central
zones have more correction in relation to each other than the outer
zones.
(This is a similar to a central hole, but a central hole often
occurs
when the outer zone correction is near %0.) In this case, we need
to
adopt a figuring stroke that corrects the edge more than the center,
which
has already been described. Hopefully this can be done without
overcorrecting
the central zones. If this occurred, some MOT normal stroke work
might
reduce it. Okay, I'm getting ahead of myself.....
Okay, let's discuss the examples. In Example 1.1, the mirror
needs more
correction in the center than in the outer zones. In Example 1.2,
the
mirror needs more correction in the outer zones than the central zones.
These
are two typical results after a couple figuring sessions.
The goal of figuring is to bring the correction (differences in ROCs
between
the zones) to the ideal values at the same time. This is a bit
like
herding cats, but it can be done, I assure. The key is to SLOWLY
add
correction and CONTINUOUSLY adapt our technique. We'll sneak up
on
a nice smooth parabola and surprise it by aluminizing it before it can
get
away!
So why do we use the strokes described above? Here's the
principle
involved in parabolizing, and in lots of figuring: The
pitch
lap can be visualized as doing most of its work at the edge.
For simplicity,
I'll
refer to the figure below. So, when figuring, imagine the
indicated
parts of the lap working the most on the mirror. When the
mirror
is offset to the side, the center of the mirror is nearly over the edge
of
the lap, where the action is. Thus, the center is being worn down
more
than the rest of the mirror. If the mirror is slightly
decentered,
the area worked most on the mirror is the area just inside the edge,
like
the outer zone or two. So, if we modify the parabolizing stroke to have
more
forward and back strokes when a certain part of the mirror is over the
edge
of the lap, then that part of the mirror will generally get more
correction
added than the other areas. That's it in a nutshell - that is the
one
guideline that will let you figure a mirror!
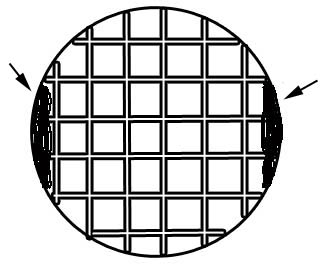
Now this part of the lap is not the only part that is active and
polishing,
but it can be a very powerful visualization tool. If you mark the
zones
on the back of the mirror with marker, you can easily see when they are
passing
over the these areas of the lap and adjust your strokes. This
will
take practice and adjustment depending on your lap and polishing style,
and
you will have to observe where the correction happens - it may
happen
just inside or just outside where you are visualizing it, and
this
is why figuring is an art, not a science.
Remember that to add correction, you must change the slope relationship
between
two zones - if you want to increase the correction between zones 1 and
2,
then you can "wear away" zone 1. Then zone 1 has a steeper slope
than
zone 2, and the correction increases. If you wear away both
zones a much smaller change or no change in correction may occur.
With this "active" lap area in mind, we now understand why the
following strokes
work
to do what they do:
The stroke shown in the first figure may be effective in bringing the
mirror
in Example 1.1 closer to the ideal parabola. With this technique,
the
center of the mirror is over the edge of the lap. Most correction
is
added to the center.
The stroke shown in the second figure may be useful for Example 1.2.
Here,
the edge of the mirror passes most often over the edge of the lap.
Correction
is added in the outer zones, mainly. Care should be used with
this
stroke, and a careful watch should be kept for signs of a turning edge.
Well, this may seem like a very short, fairly simple explanation of
figuring,
but the techniques described above are just about it. Together
with
a good computer program to reduce the date, you can make an excellent
mirror
by following these guidelines:
1) Try to add correction in the outer zones first. Test
often.
2) Modify the polishing technique to add center correction once
the
outer zones are 50% corrected or so.
3) Try to bring all zones to correction at the same point.
It
is much easier to correct the center when the edge is done than to
correct
the edge when the center is done. Try to get the edge right
first, if possible.
4) Use a computer program to find the "high spot" on the mirror,
and
(gently and slowly) wear it away using the "active lap area"
visualization mentioned above.
1.3 - Computer analysis programs
- A very good thing
Use software that you are comfortable with to produce an error profile
of
the mirror. Try to make the outer zone flat - that is, adjust the
ROC
in the program until the outer zone has zero error. For an
undercorrected
mirror, the central area of the mirror will appear high (possibly VERY
high),
indicating that more parabolization is needed overall to reduce the
central
error. Once the corrections are within 30% or so of 100%, take a
closer
look at the error plot. It may indicate the high areas are fairly
specific
- say a high center or a raised 80% zone. If so, work these areas
over
the edge of the lap with some side-to-side blending motion to keep the
surface
smooth.
I have used FigureXP quite a bit and I like it. The latest
version
lists % correction between adjacent zones, the same number I used in
the
examples.
1.4 - Some Final Tips
Don't forget the normal MOT and TOT strokes. If you get in a
situation
where the correction is high, then low, then high as you go from the
center
of the mirror to the edge, you have a "kink", as Zambuto has called it.
A
kink can also have low, then high, then low correction. The first
type
(high-low-high) indicates a raised area. The second
(low-high-low)
indicates a depressed zone. These should show up on the error
profile.
These kinks can be reduced by applying one of the normal strokes.
If
the kink is near the outer edge, do TOT. If it's near the inner
edge,
do MOT. Overall correction will decrease, but you will have a
smoother
mirror, and you can just start back in with parabolizing. The
normal
strokes are a "soft reset" or "undo" button.
Don't be afraid to go back towards a sphere - it will help you out.
Usually
the tough problem that you're avoid will be replaced by a simpler
problem,
like a high center. Also, you don't have to go all the way back
to
a sphere - you can just back off the correction (anywhere from 20% to
80%)
until the problem is gone, and then start parabolizing with a MODIFIED
technique,
based on your figuring experience and how you think the lap and surface
will
react. Continuous adjustment is the key. Take it slow, back
up
if necessary, press often, and you will eventually progress to a good
figure.
1.5 - Example mirror, 6" F/6
mirror figuring log
After this mirror was polished, high outer zones remained. A good
amount of TOT work was done to remove it. When I started
figuring,
the outer zone had about 0.010" of correction in it already, and the
edge
was good.
For figuring, I use a slow-acting refined Cerium oxide. Decanted
Cerium or Rouge would work fine too. Also, only very light
pressure was applied to the lap.
The pitch lap was fairly soft - 0.086" of fall were measured for a 1 kg
mass in 5 minutes. Temperature was 68 degrees. Pitch was
Gugolz
55 and some harder pitch mixed in.
Step 1: 15
minutes of my
standard parabolizing stroke (not Texereau's), with less center
emphasis.
Also, shorter strokes when going COC to avoid further correcting
edge
at this point, since it already has some correction. For the
following
Foucault readings, R = reading of KE position, R-R1 = reading minus
first
reading, and ideal is the ideal KE reading for a perfect parabola, all
in
thousandths of an inch.
Foucault readings: Zone # R
R-R1 Ideal Correction
-----------------------------------------
1 88
0 0
2 92 4
17 Z1-Z2: 24%
3 99 11
32
Z2-Z3: 47%
4 109 21
46
Z3-Z4: 71%
So, we observe that the outer zones are more corrected than the inner
zones. This is fine, since the center is easier to correct.
Step 2: 10 minutes parabolizing
stroke, with a bit of extra action for center of the mirror, that is,
when
the mirror overhangs most.
Foucault readings: Zone # R
R-R1 Ideal Correction
-----------------------------------------
1 65
0 0
2 81 16
17
Z1-Z2: 94%
3 90 25
32
Z2-Z3: 60%
4 104 39
46
Z3-Z4:100%
This step produced full or nearly full currection between zones 1 and 2
and between zones 3 and 4. The correction between zones 2 and 3
is
lagging.
Step 3: Go to short normal strokes to widen
central
hole and generally reduce correction, and even it out. Do 1/6 D
strokes
with a little side swing for 6 minutes. Do 5 minutes of
parabolizing
strokes afterward to add a little correction back..
Foucault readings: Zone # R
R-R1 Ideal Correction
-----------------------------------------
1 50
0 0
2 63 13
17
Z1-Z2: 76%
3 72 22
32
Z2-Z3: 60%
4 85 35
46
Z3-Z4: 93%
All zones reduced, but this effect was the most pronounced in the
center
zones, since we did MOT. Need to add correction outside of zone
1,
in zones 2 and 3.
Step 4: 8 minutes of normal parabolizing
strokes,
with some emphasis on zones 2 and 3. That is, when zones 2 and 3
are
over the edge of the lap, more forward-and-back strokes were performed.
Foucault readings: Zone # R
R-R1 Ideal Error Correction
-------------------------------------------------
1 65
0 0 0
2 81 16
17
-1 Z1-Z2: 94%
3 90 30
32
-2 Z2-Z3: 93%
4 104 45
46
-1 Z3-Z4: 107%
FigureXP shows ~1/30th wave P-V on the wavefront.
Surface is smooth,
and edge is good. Slight work on the transition between zones 3
and
4 could improve the figure, but at some risk. Alternatively, the
normal
parabolizing stroke, avoiding working the center, could improve the
numbers
slightly. Working time would be a minute or two. This
mirror is done.
Well, there's the process of figuring a moderate F-ratio mirror in 4
steps.
This mirror lives in my travel scope. It is a good
planetary
performer. F/6 is a good compromise for this size mirror if you
want
to observe planets and deep sky.
Hope this example was helpful. Here's a link to the FigureXP file for this mirror. Right click
to download the file ("save link as").
Clear skies
and
happy figuring,
Michael
Lockwood