Secondary Mirror Fabrication
The secondary mirror for the 16.25" F/12.5 classical cassegrain will be
5" in diameter, with a radius of curvature of 50.21". Its conic
constant is -3.44, and its amplifying power in the Cassegrain system is
3.32 X. The mirror and test plate (tool) will be ground and
polished at the same time. Then the test plate will be figured,
and the mirror will be matched to the test plate using interference
testing.
Oct. 21, 2004:
The glass for the secondary mirrors arrived today. I will be
doing the club 5" secondary in parallel with my own 4" secondary, for
my future 12.5" F/12.5 classical Cassegrain. The F/4.2 primary is
currently being refigured. My secondary has an ideal ROC of
47.33".
Nov. 7, 2004:
My grinding spindle is now complete and operational. Today I
started grinding the secondary mirror and test plate with 80 grit
carborundum. I hogged out the F/5ish curve in about 1.5 hours,
while learning how to use the spindle best. The spindle speed was
between 60 and 90 RPM.
The mirror still has an unground spot in the center
that's about 1" in diameter and shrinking. When it is gone, I
will grind the backs flat and hog out the curve of my 4"
secondary. I finished refiguring my primary on Nov. 3rd, (mirror
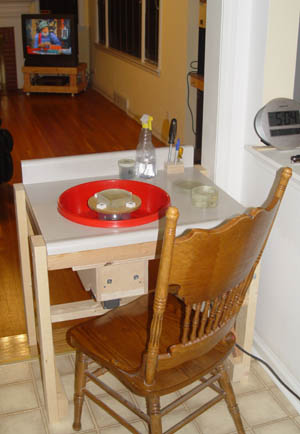
#14 for me!). Here are some small pictures of the
turntable. The first picture shows the view - I can sit
comfortably and grind mirrors while watching TV (Yes, that's Red Green
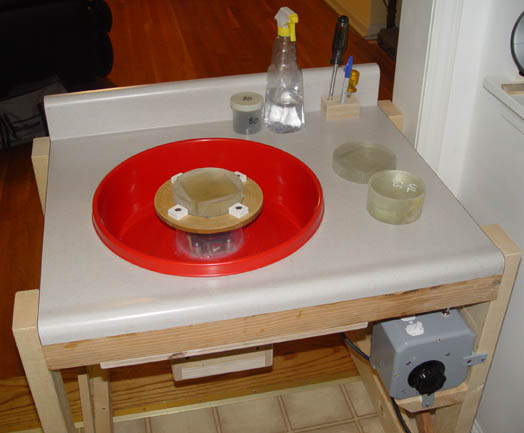
on the screen). The second picture shows a larger view of the table top
and speed control (grey box at lower right). The two larger
blanks are the 5" secondary and test plate, the smaller ones are the
4". I can sit with my legs under the machine, so there's no
strain on my back. Three hours of work causes very little
fatigue, which is quite different from three hours of "walking around
the barrel".
As of 11:30pm, the mirror has a low spot in the
center about 1" in diameter that hasn't been ground yet.
Hopefully another hour of grinding will eliminate it. The test
plate has been ground over the whole surface. The sagitta is
still very close to the desired value of 0.0622".
Nov. 9, 2004:
As of this evening, I'm done with 80 grit on both secondaries and test
plates. The backs have been ground flat, and the curves are close
to their ideal values. Time to move to 120 grit. I also put
together a first working version of a spherometer tonight, and it's a
very convenient way to check the curves. I'll post a picture of
it soon, and I already know I need a more accurate dial indicator for
it.
Nov. 11, 2004:
After the CUAS meeting I finished 220 grit on both mirrors. Time
to move on to 25 micron aluminum oxide. My spherometer (pictured
below) indicates that the sagittas of both mirrors are near their ideal
values. After some fine grinding, I'll verify this with the
flashlight test.
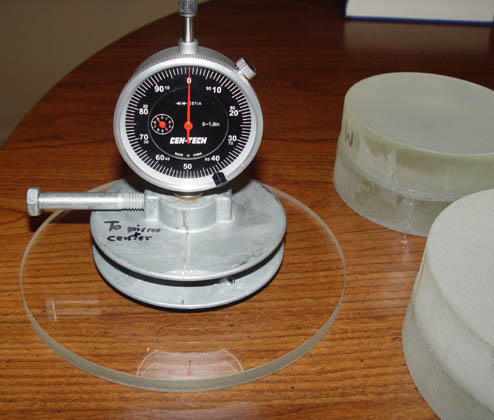
Here's the spherometer, sitting on a cheap
optical window that I use to zero it. The spherometer uses a 4"
diameter pulley as a base, with a 3/8" bushing pressed into the 1/2"
bore of the pulley. The dial indicator fits in the bushing.
On the underside of the pulley are three 0.375" diameter bearings,
epoxied into three holes that are as close to the same distance apart
as I could get them. The bearings are approximately 1/4" in from
the edge of the pulley. They are also as equidistant from the
center hole as I could get them.
The dial indicator is new
and dependable and reads to 0.001", but I am shopping for one with a
resolution of 0.0001". The blanks next to it are the 5" secondary
and test plate and my 4" secondary and test plate.
Nov. 14, 2004:
I have finished 25 micron on both mirrors. Initial tests with
light indicate that the ROCs of both mirrors are fairly close to their
ideal values, in agreement with the spherometer measurements.
(The spherometer was calibrated by measuring mirrors of known
ROC.) I
will get more accurate tests after grinding with 12 micron.
Nov. 16, 2004:
I have FINISHED FINE GRINDING both mirrors/test plates. The
sequence was 25, 12, and 5 micron (MicroGrit, which is great stuff, by
the way) aluminum oxide. The
ROCs are within approximately 0.125" of their ideal values, on the
shorter side. This was the desired result. The quality of
the finished grind is quite good, with no noticeable defects. The
last two abrasives only required 20 - 30 minutes of work, not including
slight ROC adjustments accomplished with 5 - 10 minute MOT or TOT
grinding spells. At 12 micron, it appeared that 10 minutes of TOT
shortened the ROC by about 0.25". Lengthening the ROC takes
longer since more glass must be removed.
Polishing will be done MOT until an accurate ROC can
be determined with the Focault test. Time to make some pitch
laps! Also, I need to polish the backs of the blanks (using a
high speed method) so that interference testing is easier.
Nov. 19, 2004: Poured
and channelled the four pitch laps for the two mirrors and test
plates. I also drew plans for an adjustable manual overarm for
the machine, and started glueing together the wooden parts.
Nov. 21, 2004:
Finished the overarm and installed it. Polished the 5" test plate
for about 2.75 hrs with the machine. It is very nearly polished
out! Machines are great! ROC is just under 50 inches, a
little low. Some more TOT (test plate on the bottom) polishing
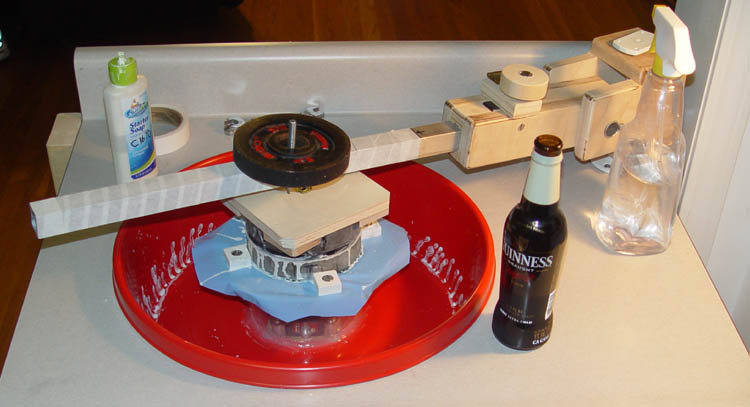
should correct this and result in a complete polish. Here's a
picture of the overarm during polishing. All the items in the
picture are critical for the successful completion of the project.
Nov 28, 2004:
The secondary and test plate are polished out. The test plate has
been partially corrected (about 40%), and I'm bringing the radius of
the mirror closer to that of the test plate. The test plate is
essentially a 5" F/5
mirror with 3.45 times the normal correction (with respect to a
parabola). The ROC has held at 49.9", about 0.3" short of the
ideal value. This error is within tolerance, and will make the
focal ratio of the instrument F/12.55. This effectively
adds a small amount of back focus, which is fine.
Dec 2, 2004:
The 5" test plate now has a wavefront error of around 1/3 wave P-V
(peak to valley). The goal is 1/10 wave P-V wavefront error or
better. Not far to go now.
 Dec 6, 2004:
The 5" test plate is DONE. Two focault test masks, one with 5
zones and one with 4 zones (centered on the borders of the 5-zone mask)
were used independently to check the figure. Both indicate a
wavefront accuracy of 1/18 wave or better, P-V. This is quite
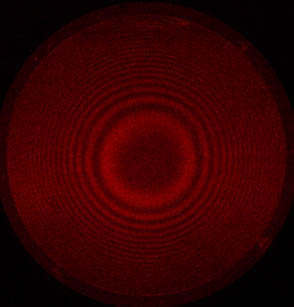
good. What remains now is to match the secondary mirror to the
test plate using interference testing. Currently there are about
17 fringes of difference between the two, as shown in the image to the
right. The test plate is concave relative to the mirror, so I
will be working the outer part of the mirror to make it more convex.
Dec 6, 2004:
The 5" test plate is DONE. Two focault test masks, one with 5
zones and one with 4 zones (centered on the borders of the 5-zone mask)
were used independently to check the figure. Both indicate a
wavefront accuracy of 1/18 wave or better, P-V. This is quite
good. What remains now is to match the secondary mirror to the
test plate using interference testing. Currently there are about
17 fringes of difference between the two, as shown in the image to the
right. The test plate is concave relative to the mirror, so I
will be working the outer part of the mirror to make it more convex.
Figuring the test plate was not easy, but I managed
it with only the full-size lap. About 7 waves of glass were
removed at the center of the test plate to add the correction.
The knife edge (KE) movement (for a moving-source tester) was about
0.170". For comparison, with the same tester my 16" F/4 had
~0.240" of KE movement, and the 30" F/3.8 had a bit over 0.500".
So, for a small mirror, it's quite corrected. The key is that it
is of good figure, and after matching the mirror to it we will have an
excellent secondary.
Convexing the mirror will start in earnest tomorrow
night.
Dec 8, 2004:
I made a harder lap and carved out the center, and made tapered facets
that got wider toward the edge. After 1 hr. of using this on the
turntable, (mirror on the turntable, rotating about 60 RPM, lap held in
my hands and not turning), I am down to 12 fringes of relative
concavity around the outer 1" or so, and a 4-fringe bump in the middle.
Dec 10, 2004:
Now it's 8 fringes around the edge, and a small bump in the
center. Thanks to Bob R. for the "polishing fuel", in the form of
a Guinness 6-pack. I enjoyed talking with everyone at the CUAS
holiday party.
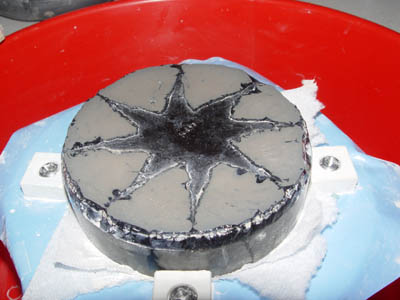
Here's a picture of convexing lap versions 1 and
2. These were used to wear down the edge and make the secondary
more convex to match the test plate. With these I went from the
previous fringe picture to about 2 fringes of error fairly quickly and
painlessly. Some polishing with the full lap was intermingled to
keep things resonably smooth. The turntable was indispensible in
this process, in my opinion. (Hold lap in hands, move about 1/4"
stroke, watch mirror spin underneath at 45 RPM, watch TV, let spindle
do the work!)
Dec. 13, 2004:
Well, it is a good day. I think I can now say that the new optics
are now at the same level of accuracy as the old optics were, that is,
about 2/3 wave of error on the wavefront. The secondary now has
about 2/3 fringe of error (and fringes ARE the wavefront).
I have been using the second convexing lap to
carefully work down the edge, and smoothing from time to time with the
full lap, 1/3 of 1/4D stroke with heavy pressure and slow
strokes. Pressing is done every 5-10 minutes. There were
also some figuring strokes done to reduce the raised zone at the 50%
zone.
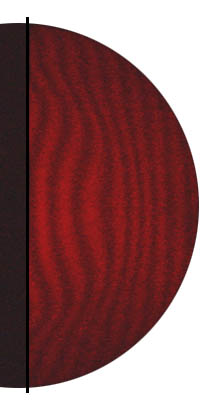
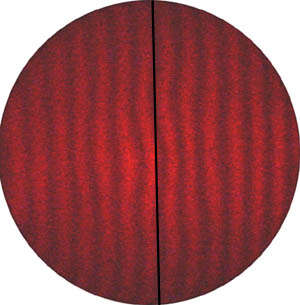
Here's a picture of the fringes, taken right after
my last work session (last night). Curvature to the right
indicates a high zone in the mirror. As of today, the error
has decreased about 1/3 fringe from the picture. The right half
of the mirror is shown, and the black line is my digital attempt to
provide a straight reference line. A bump is visible at the 50%
zone, and there is a slight turned edge. The edge is coming back
with continued work.
Matching a convex surface to a concave reference is
an excellent way to observe the effects of different figuring strokes
and techniques. This is lots of fun. Right now the entire mirror
is convex with respect to the edge, so I just have to wear away the
"high spots" as they appear.
Dec 14, 2004:
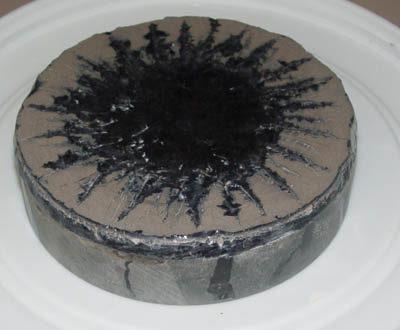
I made a petal lap to work down
the high 50% zone. It worked quite well, and the outer edge
continues to come up. Two 8-minute sessions were done, as well as
a few sessions of slow MOT polishing to remove some slight
convexity. Here's a picture of the petal lap pattern, cut out of
a piece of blue plastic, that was used to press in the pattern.
The pattern was freehanded, just using my judgement, no fancy computer
design. After the work the picture to the right below was taken
of the fringes. The straight black line was added digitally for a
straight reference line. (The goal of the figuring is to finish
with straight fringes.)
The center of the mirror is about 1/3 fringe
high, and the 60% zone is about 1/4 fringe high. Another petal
lap will be made to work these areas down a bit. Working time
will be on the order of minutes. Now the figure is at the point
where the atmosphere and thermal effects will be the limiting factors
in performance on most nights. Stay tuned.....

Dec 15, 2004:
The figure has improved farther, but the temperature in the house
hasn't been stable enough to get the mirror and test plate equalized to
take a picture. I used a couple more petal laps to bring down the
high zones seen above. This morning I did a quick figuring
session to work on the last remaining "up" zone near the edge, and I
will see the results when I get home.
Dec 16, 2004:
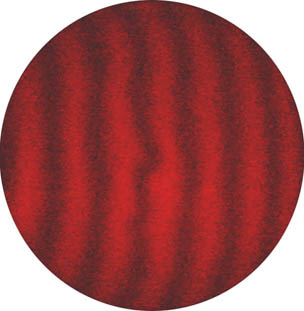
Well, this should be the final fringe photo. Ignore the small
bump in the center, it's hidden by the secondary's shadow. The
fringes are slightly curved, but this curve is smooth. This
indicates that the mirror is slightly convex with respect to the test
plate, but this small difference in ROC only changes the correction
insignificantly. Thus, the mirror is a nice hyperbola, but a
slightly more convex one than the test plate. Additionally, the
fringes indicate that the surface of the mirror is smooth. What
does this mean? The mirror is accurate, smooth, and
DONE!!!!! Now we just need an improved declination axis, and some
cooling fans......
 That's all
folks. Time to pack up these optics and get them off the coater,
and start polishing my own Cassegrain secondary. I'll have to
start a page for that scope, which will start construction as soon as
the secondary is done.
That's all
folks. Time to pack up these optics and get them off the coater,
and start polishing my own Cassegrain secondary. I'll have to
start a page for that scope, which will start construction as soon as
the secondary is done.
THE
END