Making a 32" F/4 (2.1"-thick) BVC Mirror
I have been talking about this project now since late 2005/early 2006,
so I know many are interested to read this page for a variety of
reasons. Glad I can finally write it. It is May 11, 2006,
as I type here, and the mirror was finished yesterday. What
follows is a summary of the process, and a summary of what I learned
about BVC, a material that has been somewhat
controversial in ATM circles in the past..
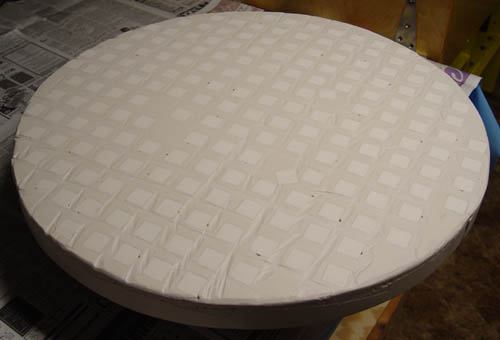
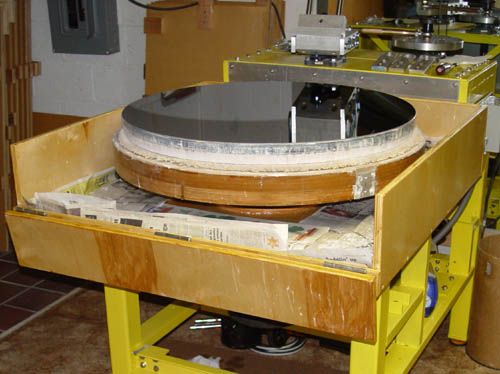
To start work, I first cast a 24" Hydrostone tool with imbedded 1"
square
porcelain tiles. 45 lbs. of Hydrostone were required.
Coverage of tiles was approximately 50% of the surface area.
To cast the disk,
a circular hole was cut in a piece of plywood and placed on top of the
mirror
blank. The hole was lined with plastic, and then a dam of
aluminum flashing
was inserted to form the walls of the mold/form. I used masking
tape
to seal the plastic to the flashing. The tiles were glued to the
plastic
with super glue, and the plaster carefully poured on top. The
form
is shown below.

Below is a photo of the finished tool. Using my 4" grinder and a
diamond
blade, I ground out the channels a bit to allow water and slurry to
circulate, and to help reduce the vacuum effect of a tool and mirror in
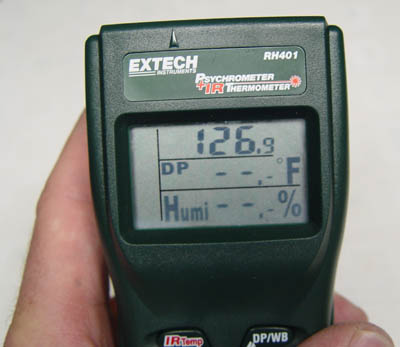
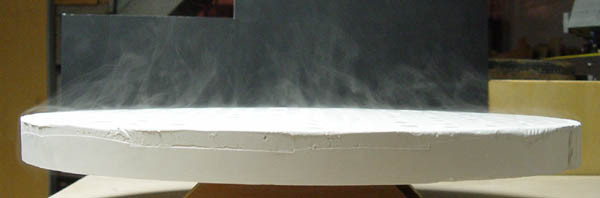
close contact. While the tool was curing, I used my infrared
thermometer to measure its temperature. Seemed like it was warmer
than the reading - it was actually steaming, as seen in the third
photo! (By the way, that meter
is very useful for figuring out if your mirror is about to dew up - it
also
calculates relative humidity and dew points.)
I started grinding with 220 grit to remove the numerous deep scratches
that
the previous worker left on the surface. An hour of grinding with
the
24" tool on the machine was sufficient to both establish complete
contact
with the tool and to remove the scratches. I proceeded through
320
grit, 25 micron, 12 micron, and 5 micron grit to complete grinding.
I
found that excessive turntable speed with 5 micron caused scratches, so
I
went back to 9u and finished with that size grit. With a larger
mirror it's best to fine grind slowly
with the smaller grits. I never had this problem with my smaller
machine,
but because this mirror is larger there is a larger speed difference
between the tool and mirror at the edge of the mirror (simply due to
larger
size), and this extra speed can cause scratching.
I found the BVC glass to grind quickly (faster than Pyrex) and without
any
scratching provided the speed was kept down in the smallest grits.
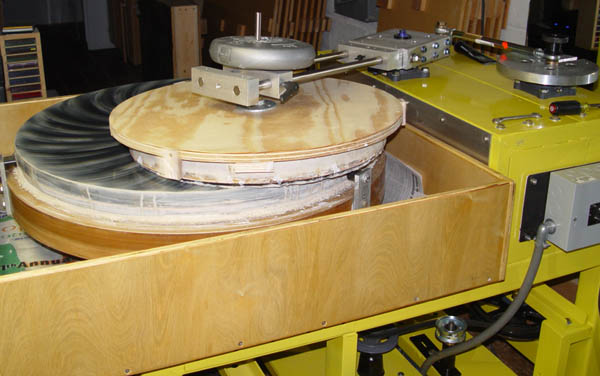
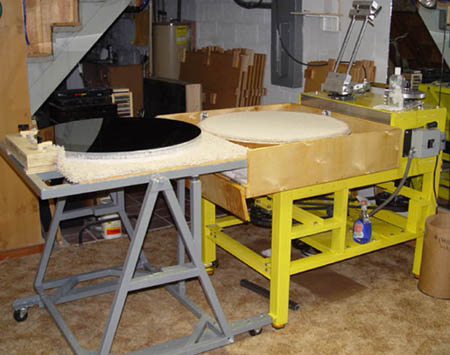
Polishing was done with a 22" pitch lap, poured on a plaster tool that
I already had leftover from making our 30" F/3.8 mirror. From a
nice 9
micron grind, polishing was completed in 18 hours, including a bit of
adjustment to find a neutral polishing position for the arm. I
had at most 20 lbs
of weight on the pin for polishing. More could have been used,
but
for a blank with a 16:1 diameter:thickness ratio, I believed that to be
unwise.
I was also not using very high speeds, maybe 20 RPM for the rough
polishing.
I slowed it a bit and diluted the mixture for the last bit of
polishing,
where I was trying to get the figure closer to a sphere. At the
end
of polishing I had a good edge and a generally spherical figure and a
hole
in the center. Here's a photo of polishing in progress.
Testing was accomplished with a tilting test stand on wheels that could
be rolled right
up to the grinding machine turntable. The test stand was made by
Bob Holmes from, and consists mostly of welded 1.5"
square
steel tubing left over from the scope construction. The blank is
slid off the carpeted turntable onto the carpeted test
stand.
The top of the test stand is lined with shag carpet
to make the sliding of the mirror easier, and to support the back of
the
mirror when it is tilted into testing position. The transfer of
the
mirror to the cart is shown below. First the front of the drip
pan
is folded down, and then the cart is positioned and the transfer made.
Next, a piece of wood is installed to prevent the mirror from falling
forward. Finally, the stand is rolled to the test location, a pin
is removed, and the
mirror and the top of the stand are tilted to nearly vertical for
testing.
A couple of views of the mirror on the test stand in testing
position
are shown below. As can be seen in the second photo, the mirror
is tilted back about 2", a few degrees.
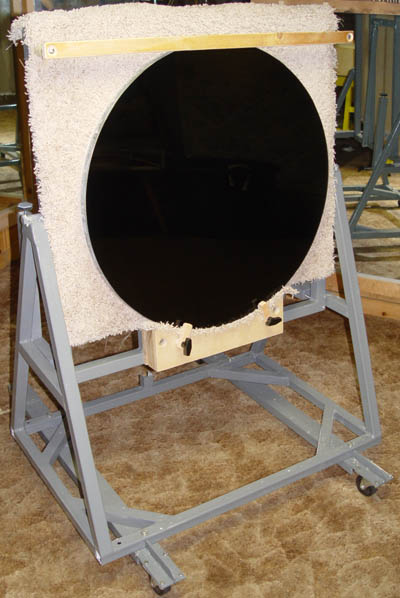
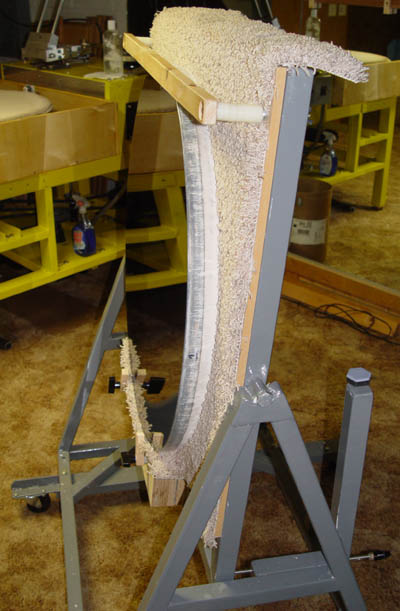
Compared to a hard surface, which never supports the back of the
2.1"-thick mirror
evenly (and thus causes strange Foucault shadows), the carpet does an
excellent job of supporting the back and bottom of the
mirror at this shallow angle. Distortion from mirror folding and
irregular back support vanishes
in the Foucault test, and reading the shadows is no different than on
smaller,
thicker mirrors. A threaded rod and knob make tilt adjustments
simple,
aiding in the speedy setup for testing. I could tilt and line up
the mirror in about two minutes.
Figuring was mainly done with the aid of the machine to save my arms,
using a 16" pitch lap. I found that the BVC blank also gained
correction faster than Pyrex, and once I found the right machine
settings I was able to whip the figure into shape fairly quickly.
My technique was to approximate as best I
could my particular flavor of the subdiameter lap method of figuring,
as described
by Texereau. Towards the end of figuring I used a 4.25" pitch lap
to
work on a few high regions, and only a few turns around the mirror were
required
to cure them.
The only problem that I had was minor. When I switched to a
figuring
compound (Hastalite R-polish) to slow the speed of figuring, I got some
sleeks. This happened twice, so I am fairly sure it was due to
the figuring compound. Switching back to my normal Cerox 1670, I
found no sleeking problems. Since I've never had problems with
sleeks or scratches on
any of the other 40 mirrors I have made and since I am very careful in
my
optical work to avoid dust, contamination, etc., I think that the
Hastalite
and the BVC simply didn't work well together. It is also possible
that
clumps of the Hastalite formed and caused the sleeks.
Let me point out that until I used the Hastalite, I had a PERFECT,
scratch-free
surface. So, I personally didn't find BVC more susceptible to
scratches,
contrary to what some others have concluded. I believe that if I
had
used the Cerox 1670 exclusively, I would have had no sleeks. In
any
event, they will have no effect on the images formed by the scope.
I will also say here that the black BVC surface is COMPLETELY
unforgiving when it comes to pits, sleeks, and other surface
imperfections because they stick out like a sore thumb! This
makes grinding and testing for polish easier, but you ego can be
damaged by the slightest sleek that might go completely unnoticed if it
was on a Pyrex surface.
According to my Foucault testing results, the final figure had an error
of 1/7th wave on the wavefront, with a good edge (see diffraction ring
in photo below, though weakened by resizing the photo). Normally
I'd shoot
for 1/10th wave or better on the wavefront, but some time constraints
beyond
my control related to getting the scope operational required me to use
some
different methods than I normally would, and I had to stop there.
Still,
I am quite pleased with the final figure and the general form of the
mirror.
An image of the mirror under test is included below, though it
does
not do the smoothness and beauty of the shadows justice, in my opinion.

The weak, dark vertical artifacts are due to diffraction of the knife
edge,
or some related phenomena - they are not on the mirror. The
irregular
outline of the mirror at the top (which is actually at the bottom in
this reversed image) is due to the safety clips and the shag carpet on
which the
bottom of the mirror rests. The bright artifact in the dark
central
region is a stray reflection.
Note the smoothness of the figure, and the vertical symmetry of the
Foucault
shadows. This mirror showed excellent smoothness and a lack
of zones, looking like a textbook conic section on the test stand.
In short, I thought it looked like the surface I expect to
see when I work on a Pyrex mirror. I have actually had more
problems
with surface roughness on plate glass mirrors than on Pyrex mirrors or
this
BVC mirror.
There have been reports from others that BVC was difficult to keep
smooth
and that it reacted strangely to figuring. However, I could not
detect
any surface texture at all visually, nor did I have problems
with
surface roughness. In fact, I found one benefit when testing BVC
-
within 5-10 minutes of the conclusion of figuring, the boiling air
currents
that I am used to see rising off of Pyrex were completly absent.
The
figure did change as it cooled, in a manner similar to Pyrex
(overcorrection
during cooling), but the surface could be observed in great detail very
quickly
after it was worked. This implies that a cooling BVC mirror might
have
a "weaker" boundary layer than a Pyrex mirror.
In conclusion, I found the following concerning grinding, polishing,
and
figuring a large, fast BVC mirror:
1) I found no evidence to support the assertion that BVC is more
prone
to scratching than Pyrex during grinding and polishing, but
2) I had problems with sleeks with my fine figuring compound,
though
I have never had problems with it when used on Pyrex.
3) I found BVC to grind faster than Pyrex, and
4) I had no problems with surface roughness when figuring BVC.
5) The black background provided by BVC makes pits, etc., very
easy to spot.
I started work on the mirror on May 14th and finished on June 10th.
(In
contrast the previous optician had it for well over a year.) For
a view of the mirror's horrific astigmatism before I worked on it, see
my Foucault
Hall of Shame page and scroll down until you see the composite
image of the mirror at various rotations.
During that period of time,
lots of my free time (evenings, weekends) was spent working on the
mirror.
I learned to work easily with a larger blank, and I also got to
try
my hand at machine figuring. I thoroughly enjoyed the process,
and
the outcome is very gratifying - my friend Bob now has an excellent
primary
mirror to use for the research he loves to do. I'm just glad I
could
help.