28" F/4.4 Ritchey-Chretién Cassegrain refiguring
Yes, that's right - it's not a typo, it's a Cassegrain with
a system
focal ratio of F/4.4.
The primary
is a perforated 28"
F/1.1 mirror, and is full thickness!
The secondary
is 8" in diameter
and disturbingly close (in
terms of distance) to the primary mirror (about 22") when
compared to the other Cassegrains I have made or worked on.
Here
is
a photo of the telescope, sans optics, in its horseshoe-type mounting.
It
is nearly as wide as it is long!
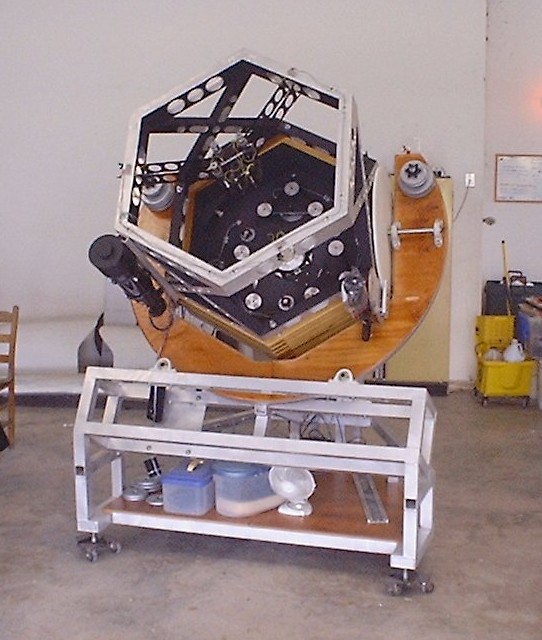
Assembled
28" telescope, sans optics
So how did this project come about?
Well, a good friend received
an email from a frustrated telescope owner (who asks to remain
anonymous)
and he
forwarded that email to me. Little did I know that this would
lead to
a nearly one-year odyssey into some very extreme optics.
Many emails and telephone calls ensued following our initial messages.
I learned more of the details of the troubled optical system with
every message. Tests were conducted and results relayed, ideas
were discussed, and it
was decided that I would attempt to fix the optics. In July of
2006 after a long drive, the optical tube and optics were delivered to
my shop by the owner.
Over the coming months I designed and constructed test equipment to
allow the primary to first be tested, then refigured. Testing
revealed that the optics were not terrible, but they were certainly not
up to optical quality in the visual wavelengths and likely were used
originally for infrared imaging. The goal for the telescope after
refiguring was to provide resonably good CCD images in the center of
the field, with the addition of a corrector anticipated in the future
to help correct for the serious field curvature and astigmatism that
shows up off-axis in a fast RC.
The primary was tested by creating a tester that formed a point source
from laser light, and allowed observation of the return image.
I'm
not going to say any more than that for now because I don't want to say
any
more - I just don't feel like explaining. It was not inexpensive
to build and is quite heavy, but it
allows
accurate zonal measurements to be taken from zones anywhere on the
mirror.
Using it as a point source for testing a mirror that is nearly
spherical,
it is a powerful and revealing test for checking for astigmatism after
polishing.
I now use it regularly to test fast optics and to ensure that my
optics
are a VERY good figure of revolution. (No, it's not an
interferometer.) No matter what anyone says, Foucault testing is
simply NOT adequate for detecting figure-of-revolution errors on
moderate to fast focal ratio mirrors.
Over the course of a couple of months I learned to take repeatable
readings with this tester, and I determined the primary mirror to be a
bit overcorrected for the system prescription I was aiming for.
However, to determine the figure, I first had to write my own
test analysis software because other software would not handle the
number of zones I wished to test, nor did I trust it with such a fast
mirror. I had been looking for a good excuse to write my own code
and now I had it! The code was written as a Matlab script and
works fine for my purposes. (No, I have not converted it to C and
I have no immediate plans to.) A photo of me working on the
primary (all done by hand) is shown here.
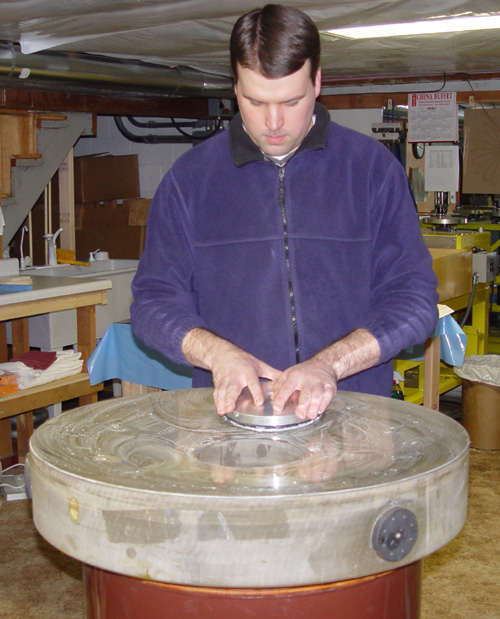
Me
refiguring the 28" F/1.1 primary
As the primary was a decent figure of revolution, I removed the high
areas and reduced the error to what I measured to be around 1/4 wave on
the glass. At this point I declared victory on the primary.
After getting the primary close enough, I planned to tune the
overall figure of the system by figuring the secondary.
Therefore, I was most concerned with smoothing the surface of the
primary mirror, as it seemed to have some zones in it. I used
techniques that both smoothed and adjusted the figure. (Based on
the final results, I believe I smoothed the primary quite a bit.)
With the primary done and uncoated, I could reassemble the telescope
and test the whole system....... after I built more test equipment.
So how does one test a 28" F/4.7 RC system with two uncoated mirrors?
Two words - collimated light. How do we collimate light?
We use a Newtonian telescope in reverse. A focused laser is
used to create a very bright spot that is a little smaller than the
airy disk for the telescope. This spot is placed at the focal
plan and voila, if the diverging cone of light has sufficient angular
spread to illuminate all of the paraboloidal primary, a
beam of well collimated light the diameter of the primary emerges from
the system.
So why not use a large flat? I am capable of making one (I even
have a 24" blank), but a
coated flat used to test the scope in autocollimation would have the
light bouncing off four uncoated surfaces, and even with a laser the
return beam was sure to be dim and alignment of the system somewhat
tricky.
I bought a couple of 24"x2" mirror blanks, one flat and one generated
with an F/4.75 curve. The flat blank was packed safely away to
make a flat from in the future, and I completed the 24" F/4.75 mirror
in January of 2007. I made it as good as I possibly could, and
checked it carefully for astigmatism with my new tester.
The
collimator structure was built in
the coming months, and the system was assembled after the mirror came
back
from coating. I used a HeNe laser rated at 1-2mW. After
collimating the system as best I could by moving the pinhole source
around (rather than tilting the primary), I put my
4.25" F/4.5
Newtonian in front of the collimator, placed a ronchi grating in the
eyepiece,
and had a peek at the results. I smiled as I observed straight
ronchi
bands, shown below, knowing that testing complete
telescopes up to 24"
in
aperture and beyond was now easily manageable in my shop.

First test of collimator
system: 85 LPI Ronchigram of my homemade
4.25" F/4.5 Newtonian using collimated laser light
The collimator also serves as a convenient way to help in the setup of
a new telescope, as it is basically an artificial star in my shop, no
matter what the weather is! One can CAREFULLY use an eyepiece to
observe a "star" image. This is done with a welding filter to
reduce the brightness for telescopes with aluminized optics. This
allows me to make sure that
all my eyepieces come to focus without taking the telescope outside.
The next step was to reassemble the 28" RC, place it in front of the
collimator, collimate the 28" (easier said than done), and then observe
the Ronchi lines through the 28" telescope for an eccentric 24"
diameter portion of the aperture. For comparison, here are some
Ronci test images taken with the assembled telescope with a real star
as the source. Significant correction error is present, along
with zoniness. It is followed by actual images of
stars, which never really came to focus. (I did not create these
mosaics.)
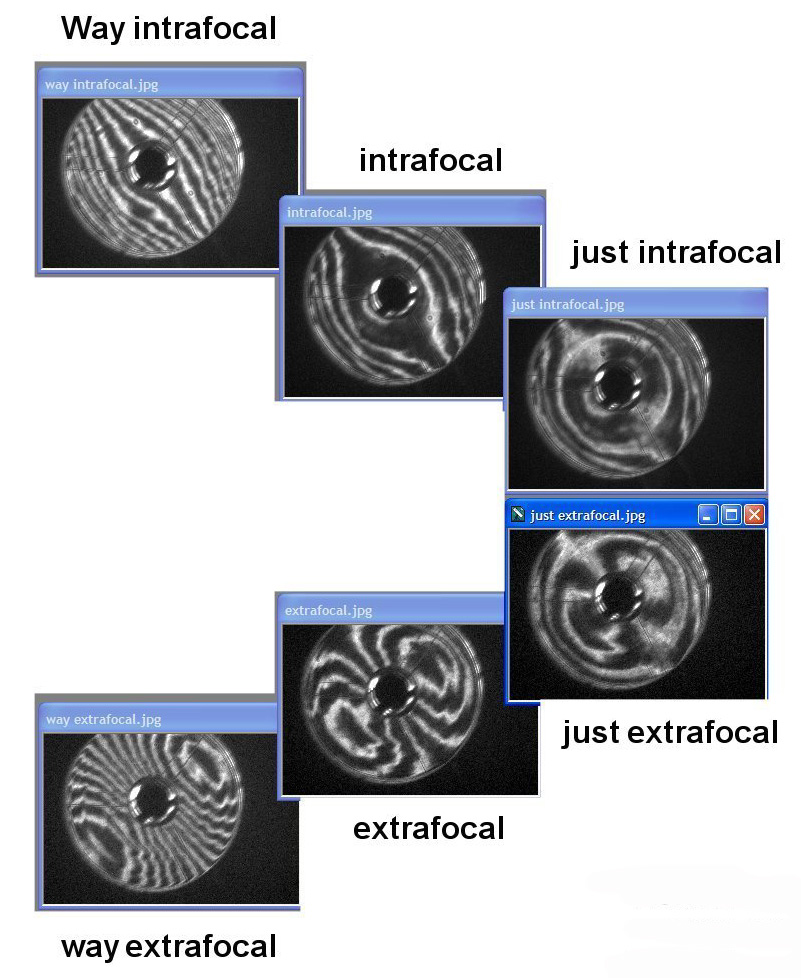
Ronchi testing of 28" RC
system using 133LPI grating and a real star as a source (BEFORE
refiguring)
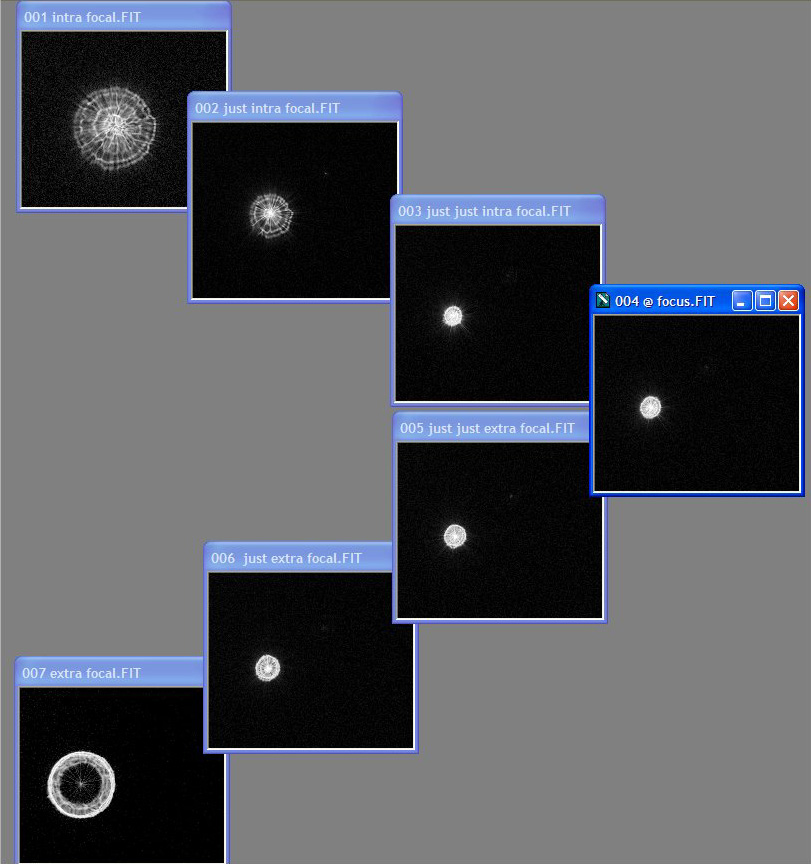
Defocused images of a real
star taken with 28" RC system
(before refiguring)
The owner had requested a change in back focus, so the
primary-secondary spacing had been altered slightly to place the focal
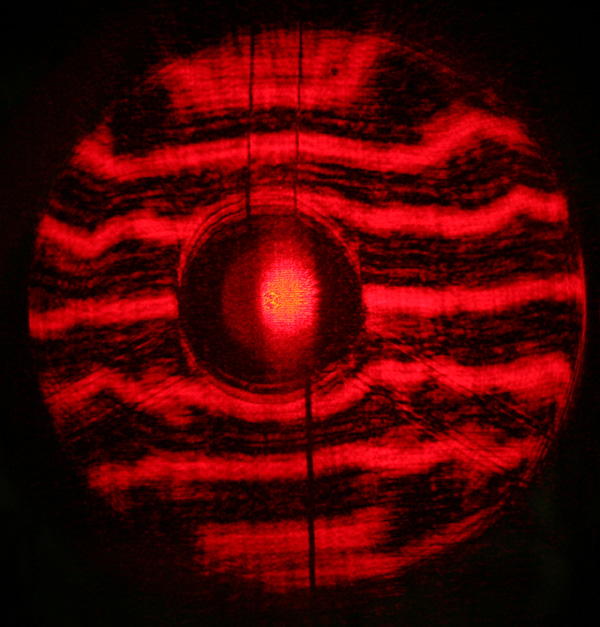
plane where he had requested. Surprisingly, my first tests of the
reassembled system showed reasonably good correction, but a number of
zones were observed.
85 LPI Ronchigram of 28"
F/4.4 system after primary work, but before secondary refiguring
Now let's get something straight here - this telescope is never going
to be perfect, not did I ever suffer from that delusion. It
simply needed to be significantly better than it was before I worked on
it. That in
itself would be a good outcome for such an extreme telescope. So,
I
plunged into the work on the secondary and emerged a month later, tired
but
quite a bit wiser. After determining that some distortion was
present in the ronchi lines at the top and bottom of the test images
due to gravity distorting the collimator mirror and the poorly
supported primary mirror (which
was never intended to be supported entirely on edge) and also due to
the
method used to retain the primary (don't ask), I determined that the
most
reasonable test
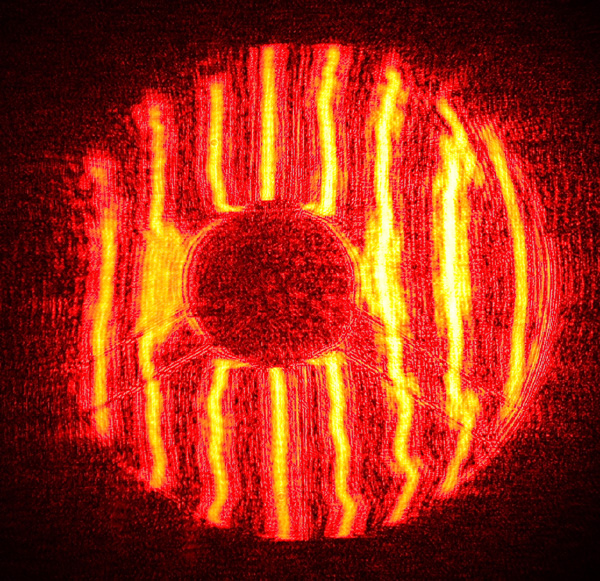
was with the ronchi lines aligned horizontally. The image below
shows
the final result of refiguring. Note that a 133-line-per-inch
(LPI)
grating has been used for this image rather than the 85 LPI used in the
previous
images, so the image is more sensitive to error.
133 LPI Ronchigram of
finished 28" F/4.4 system after primary and secondary refiguring
While it may look a bit rough for a "normal" visual telescope, this is
really good for such a crazy system and MASSIVELY improved over the
system as it was used before I worked on it. I am proud of the
outcome, but at the same time I hope to not see something this fast for
a long, long time!
The telescope was picked up by its owner this July (2007), and he was
especially pleased to use an eyepiece and view the "star" image from my
collimator as he went in and out of focus - apparently he had never
seen it focus properly, but now it was there, right before his eyes.
At that moment I felt relief,
satisfaction, and a bit of joy. Another successful project
completed,
soon to be coated and exposed to starlight for the first time.
What
a great hobby/career.