8" F/5.4 Travel Scope
A couple years ago I built a 6" F/6 travel scope. It works well,
provides
good images and is compact when disassembled, but it took forever to
assemble
and this was tricky in the dark. It also had a bungee-cord spring
counterweight
system that worked, but I wanted to avoid that if possible in my next
travel
creation.
My friend Bob recently completed an 8" F/6 mirror with my help, and in
thanks
he gave me his old 8" F/6 plate glass primary, which had been damaged
on
the optical surface near the center. So, I decided to use it in
my
next travel scope. I remove most of the surface damage by
deepening
the mirror to approximately F/5.5, which shortens the scope. This
was
done with 220 grit, and then I fine ground it on my machine.
Figuring
was simple, and done with the 75% diameter lap used to polish it on the
machine.
After ~40 mirrors or so, making a nearly perfect 8" F/6 is simple
and
quick for me... but still fun!
With the mirror done, I made the cell first to fit it and then sent it
off
to get coated. The rest of the scope took shape fairly quickly
after
I got the basic concept in my head - it would have two six-pole trusses
that
would collapse to go in my carry on bag or in my suitcase. I
first
set out to build the mirror box and secondary cage, and my concept was
that
the wire spider would be removeable so that the mirror box could next
inside
the secondary cage, which is the reverse of what many do. This
saves
space, because the minimum size of a secondary cage is larger than that
of
a mirror box to allow clearance for the light cone to fully illuminate
the
field.
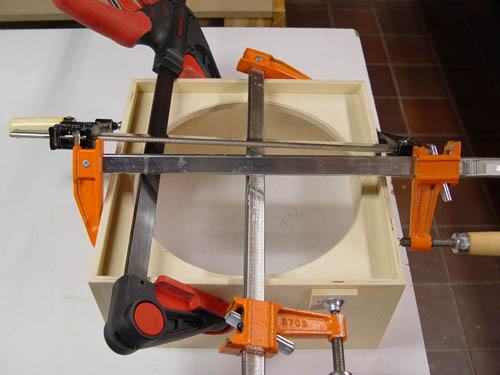
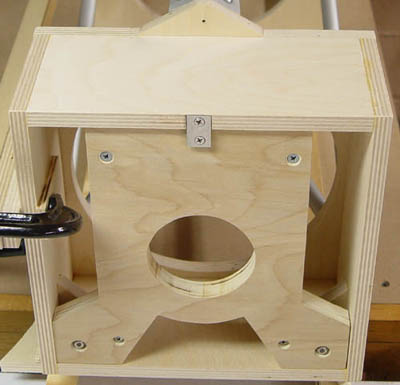
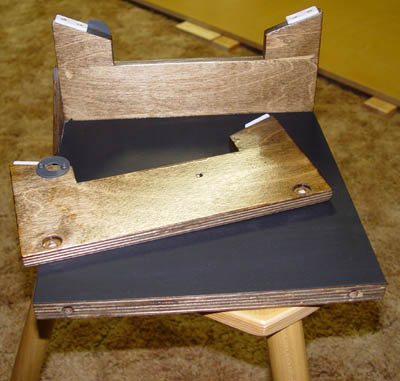
Below is a photo of the secondary cage under construction. The
cage
has 1/4"-thick sides, and a 1/2"-thick baffle set 5/8" down from the
front
of the cage. The corners are mitred at 45º and glued, and
the
baffle is simply glued inside (after careful fitting). The inside
of
the cage is only about 1/16" larger than the outside of the mirror box.
The
mirror box, picture at right below, has 1/2" thick sides (all wood is
Baltic
Birch) with a 1/2"-thick top baffle that also serves to connect to the
truss
pole system. (The thicker mirror box reinforces the thinner cage
in
transport.) Some plywood triangles are installed in the top
corners
of the mirror box near the back. T-nuts in those serve as
attachment
points for two collimation bolts. The bottom of the mirror cell
pivots
on a rubber washer. One screw holds the cell against the washer.
As
shown below, the mirror box is upside down.
The bundles of poles are just like that of my 10" F/8.8 (see my page here or see my article in the
March
2006 issue of Sky & Telescope) except shorter, and I used
5/8"-diameter
tubing instead of 1". A friend made the "hinge blocks", which
connect
the ends of the poles, out of aluminum channel welded at the proper
angle.
They work great and are stronger and less bulky than wood (thanks
Andrew!).
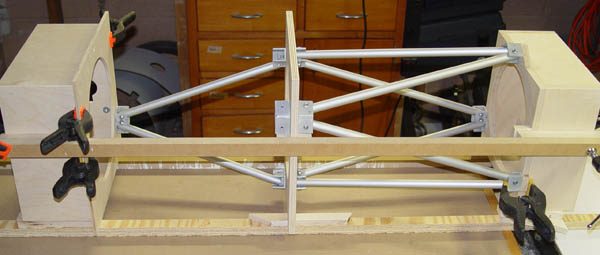
The bundles were assembled with the scope held in a jig to ensure
the
structure would be straight. To join the two bundles of poles, a
central
baffle board is installed. Each hinge block on the bundles has a
plastic
"peg" installed in the bottom, which fits into corresponding holes on
the
mirror box, baffle board, and another piece that sits agains the
secondary
cage. Here is a photo of the scope in the jig, with the last few
poles
being installed. Note the extra 1/4"-thick baffle on the right
side
of the secondary cage - this provides a point where the trusses can
attach,
and it is removeable so that the cage and mirror box "nest" together.
The
center baffle where the trusses join is simply a piece of 1/2"-thick
plywood.
You might wonder how much slop is in the two bundles of poles - the
answer
is "some". While my 10" F/8.8 and F/5.5 have no slop, this scope
does.
The key is that the whole structure is held in COMPRESSION, which
makes
slop permissible - the slop disappears when the structure is
compressed.
This means the cage is simply pulled against the thinner baffle,
which
has small protruding blocks to locate the cage against it. The
tension
is provided by a nylon strap, connected to the secondary cage, which is
pulled
tight around the bottom of the mirror box, holding the scope together
with
no latches, catches, knobs, etc. I've never seen such a design,
and
it was inspired by trying to avoid installing latches at all truss
attachment
points and making slop completely irrelevent.
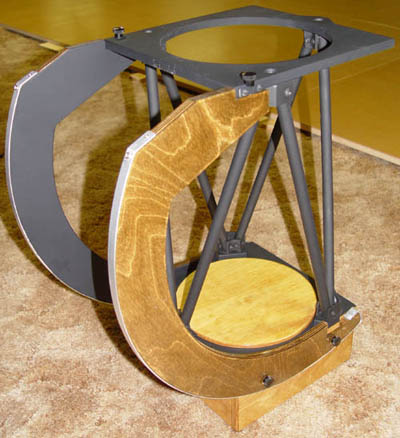
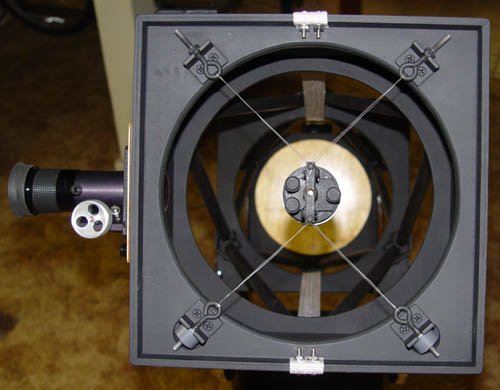
Here's a photo of the scope assembled, partially painted, showing the
strap
holding it together. Also, there is a photo of the completed
cage,
with focuser (attached to a piece of wood which attaches to the cage
with
three thumbscrews) attached and wire spider installed. The eye
bolts
slip into slots in the 3/4" aluminum angle that serve as spider
attachment
points. The two grey "nuts" installed on the eye bolts at the
bottom
left and right allow the spider to be installed and tentioned with no
tools,
and also de-tentioned and removed easily. It works.


The bundles of poles were made slightly different lengths because I
didn't
know where the balance point would be. Once I checked the balance
point,
I installed the trusses so that they would provide the most convenient
point
for attachment of the bearings, which attach to both the central baffle
and
the mirror box, thereby further strengthening the structure.
Thus,
the two-truss structure has many benefits: 1) it provides
triangles
with wider legs for more rigidity, 2) it helps baffle the optics, 3)
the
baffle provides an additional attachment point for the bearings, and 4)
the
system shortens the truss tubes by nearly a factor of two.
Below is a photo of the side bearings attached to the mirror box and
the
center baffle, with the upper truss and cage removed. Three
thumbscrews
attach each bearing. On the top of the center baffle you can see
the
three holes that the pegs of the upper truss fit into. The
bearings
are 1/2" plywood with 1/16" thick aluminum epoxied to the bearing
surface.
The wooden mirror box cover is in place. Also shown at
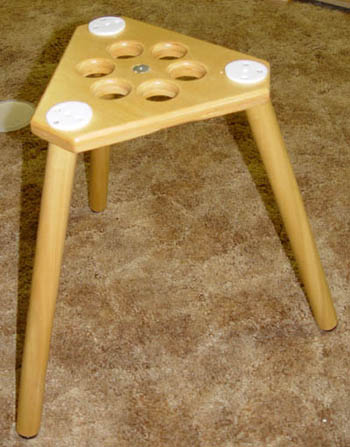
right
below is the stand that I built for my 6" travel scope - it is quite up
to
the task of supporting this scope, too, and I simply moved the Teflon
pads
out a bit to support the azimuth bearing better. The legs unscrew
for
transport.
Below is a photo of the simple rocker box. One side is removeable
to
save some more space when the scope is broken down and packed up.
At
right is a view of the painted scope looking down the tube. The
three
secondary tilt thumbscrews are visible (no tools needed), as are the
attachment
points for the nylon strap that holds the scope together. Yes,
there
is probably a better tensioner, but I used what I had on hand.
Focuser
is a 1.25" reverse Crayford from JMI, chosen due to its light weight.
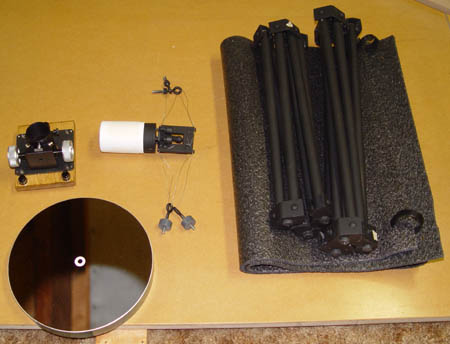
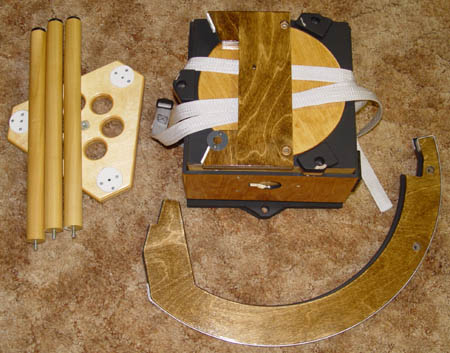
Here are photos of the items that go in my carry-on bag, at left,
including
the primary, focuser, spider, trusses, and foam light shield, and at
right,
the pieces that go in my suitcase. The mirror box is stuffed full
of
clothes. I also have eyepieces and a laser collimator to pack up.
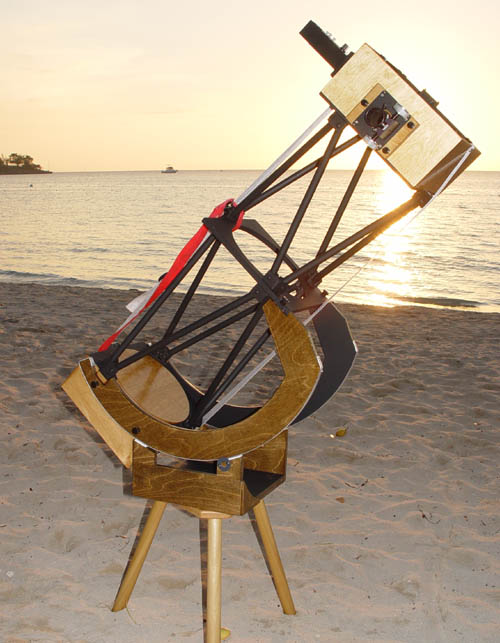
Finally, here's a photo of the finished scope at its first destination,
a
beach in Negril, Jamaica. Conditions weren't the best for
observing,
but it was still an excellent vacation without observing with the
scope,
though I did see Alpha Centauri for the first time. Ya mon!
I am reassured by the fact that I now have a travel scope that I enjoy
using
and which can be ready to go at a moment's notice. Of course, the
thought
lingers in the back of my mind - how large can I take the design?
It
is possible I could use the same sets of trusses on a larger scope of
slightly
shorter focal length, so a 10" or 12" is quite possible. The same
bearings
might even be useable!
In conclusion, this design has really given me some ideas. I have
a
thin 13.1" F/4.5 mirror that I plan to build a similar scope structure
for,
and hopefully I can improve on the tensioning method. That scope
will
be light and I suspect I will use it a lot because of that! Can't
wait.